So, you would like to know “How to Start a Travel Blog In 2022”, make money from it, and possibly even do it while you work at home. Well, there is good news for you. It is easier than ever to do just that and it won’t take you much time at all to get the ball rolling.
Congrats on deciding to start a travel blog! I will show you how to start your own travel blog in just three easy steps, a blog with your own domain name and hosted on a server of your choice even if you’re a complete beginner.
So are you ready to start your own travel blog? Here’s what you need to know!
Step 1: Choose a niche
The first step to starting a travel blog is deciding on your niche.
Your niche is simply the topic/category that you like to blog about. For example, there are blogs out there in niches like fashion, technology, politics, personal finance, tech, real estate, parenting, relationships, health, sports, photography, and so on.
I know what you’re thinking about right now: isn’t my niche just travel?
Yes, I got you so don’t worry haha.
Travel in itself is a niche and it has so many sub-niches BUT it’s okay to have a general travel blog like mine. In fact, Travelholicq is pretty “general” in that I write about many destinations, things to do, must-eat food while traveling, and topics within the travel sphere.
However, if you can “niche down” further, there are many benefits to doing so.
Here are some travel niche ideas:
- Solo travel
- Budget travel
- Adventure Travel
- Couples travel
- Family travel
- Bucket List Trips
- Wellness Travel
- Cruise travel
Above are just a few examples of specific travel niches. If you don’t have a particular niche in mind, that’s okay too! You can be successful with a travel blog either way.
You can always start off writing about whatever you want related to travel and narrow down your focus as time goes by and you realize what you enjoy writing about most. Very simple, right?
Step 2: Choose a domain name
The next step to starting a travel blog is choosing a name for it. Your blog name will be the first impression that you have on people, so it’s important to pick a good one!
Here are some tips for choosing the perfect travel blog name:
-
- Make sure it is easy to type, remember, and pronounce.
- Make sure it is short as if your domain name is long and complex, you risk your readers mistyping or misspelling it. Short and simple is the way to go.
- Try using keywords that describe your niche. For example, if you’re in a travel niche, you may want to register AdventuresWithSnigdha.com.
- Avoid numbers and hyphens in your blog name because it makes it harder to spell and remember.
- Use an appropriate domain name extension that has the .com ending available and avoid endings like .net or .org because they are less common and harder to remember.
- Be memorable because there are millions of registered travel blogs, so having a blog name that’s catchy and memorable is essential.
- Keep it professional if you plan on monetizing your blog.
- When in doubt, you can always just use your own name like AdventuresWithSnigdha.com, TravelsWithSnigdha.com, and so on.
To see if the name you want is available, you can use this free domain name checker tool:
Step 3: Get hosting
Now that you’ve got a name picked out for your travel blog it’s time to get your blog online. For that, you will need to register your blog and get web hosting.
If you buy your domain name through an outside company, you can expect to pay $15 to $20 for it, and that gonna be expensive.
However, if you sign up for web hosting through Bluehost, you can get your domain name for free.
I highly recommend Bluehost for web hosting as they provide their users a free domain name, SSL certificate, and a discount on web hosting which is a perfect deal for anyone looking to make a website. Also, they have some of the cheapest hosting plans out there making them good for new bloggers, while still having reliable service and great customer support.
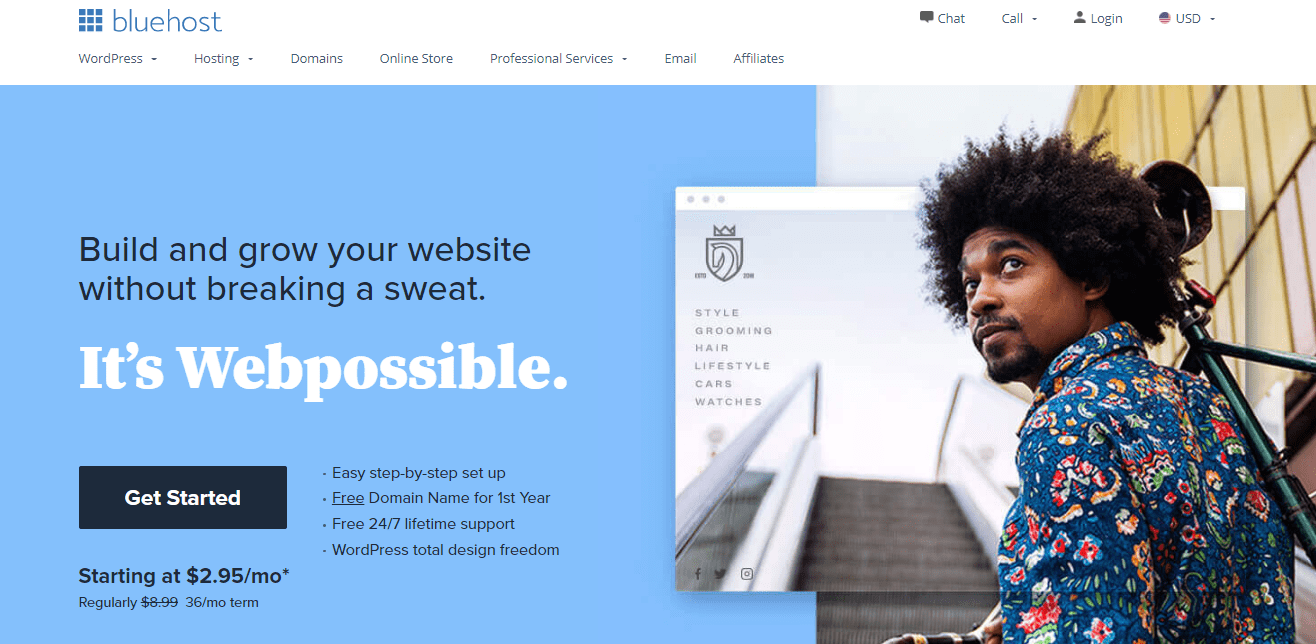
Bluehost has been great enough to offer readers of Travelholicq web hosting starting at $2.95 a month (normally $8.99 a month) along with a free domain name.
Click here to get hosted with Bluehost!
Here are the detailed steps to set up web hosting with Bluehost:
1. Click the “Get Started” button on this page
2. Select your hosting plan
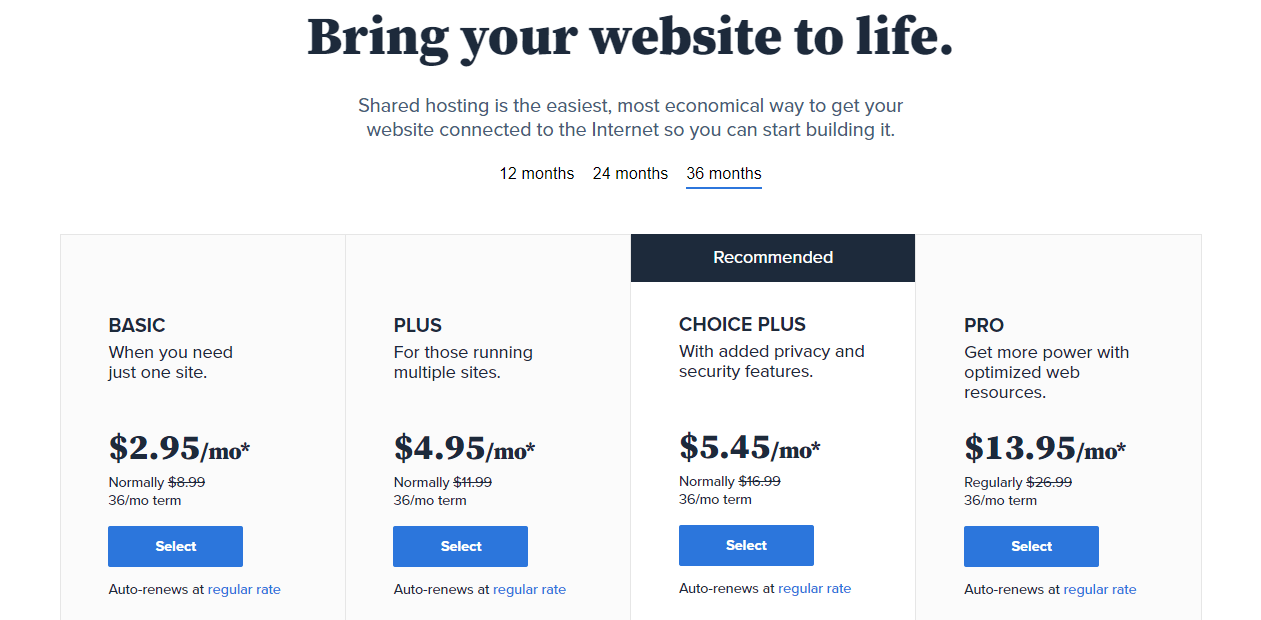
Which plan to choose: I recommend the basic plan for new bloggers.
You will start by picking a hosting plan. If this is your very first blog, you can go with the Basic plan. Later, you can easily upgrade to a Plus or Choice Plus plan once your blog starts growing.
3. Set up your domain name
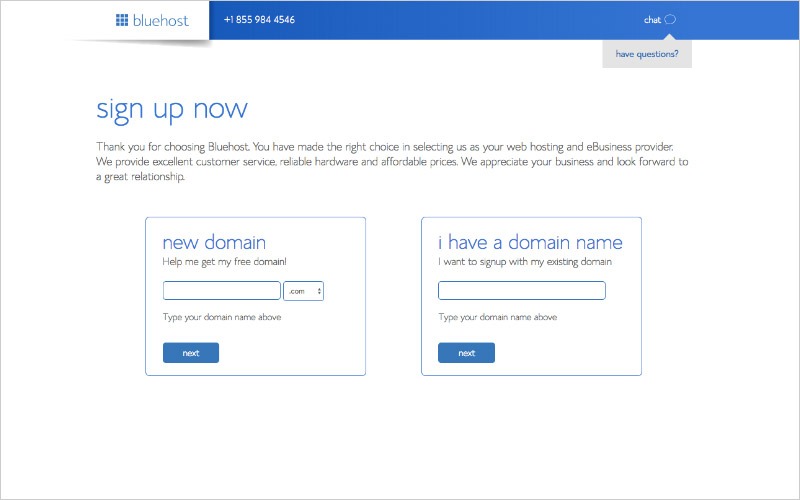
This is where you’ll put in the domain name that you decided on earlier. Your domain name will be your blog’s address, so just type in the desired name in this “new domain” box and Bluehost will show you whether it’s available or not.
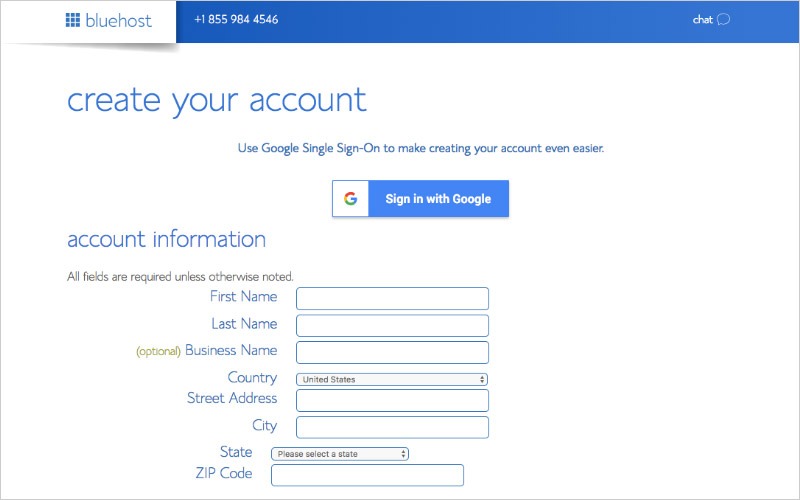
4. Create your account
5. Select your hosting package and pay
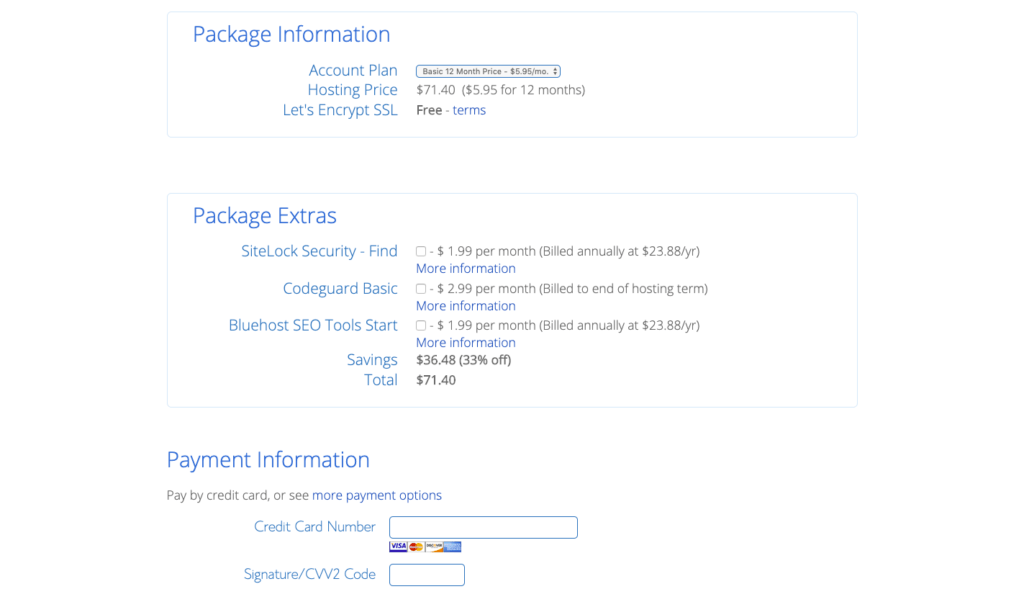
At this point, you’ll select your hosting plan from the available options. Bluehost offers 12, 24, and 36-month packages.
The 36-month plan is the best deal at $2.95 a month, but you can also pick a 12-month plan at $4.95 a month for an overall lower cost.
What about package extras? You have the options to add on extras like site backups or site security.
I personally don’t recommend any of these, because there are free WordPress plugins you can install that do the same thing which I’ll cover below.
6. Congrats, just like that you’ve nearly become a travel blogger!
Once you check out, you’ll be redirected to your Bluehost dashboard from where you can log in to your blog for the first time and start setting everything up.
Your blog will be run on the WordPress platform. Bluehost installs WordPress automatically for you, so you don’t have to do anything on your end.
Step 4: Designing your blog
The first thing your blog needs is a face (design and layout).
Installing a new WordPress theme is exciting and fairly straightforward.
Your blog will come with the default WordPress theme installed. You will definitely want to change this, which means it’s time to pick a theme for your blog!
Inside the WordPress dashboard, under the “Appearance” tab, click “Themes”. You will be presented with some popular options. You can click on the WordPress.org Themes button and search for free themes.
When it comes to designing your blog, you have a couple of options. You can hire a web designer, or you can install a theme on your own. I recommend installing a theme on your own because it’s a MUCH CHEAPER and EASIER.
There are plenty of free themes out there, but I don’t recommend them because they look very plain, don’t have many customization options, and don’t include support.
A premium theme is a much better investment and will make your travel blog stand out from the crowd.
If you need help finding the perfect theme for your travel blog, make sure to check BLOSSOM THEMES which I highly recommend.
Step 5: Install plugins
WordPress plugins add extra functionality to your blog. There are thousands of plugins out there, but the ones I recommend most for new bloggers are:
- Rank Math: Rank Math helps you write blog posts that are SEO-friendly. SEO, or search engine optimization, is what gets your blog posts ranked in Google. Yoast will tell you exactly what you need to do for each blog post you write to improve your SEO.
- Akismet: This plug-in filters out annoying spam comments on your blog.
- Loginizer Security: Loginizer Security is a great security plug-in to protect your site from any potential threats like viruses and malicious traffic.
- UpdraftPlus: This plug-in makes regular backups of your site so you never lose anything!
- Social Warfare: Add social sharing icons to your blog posts.
All of these plug-ins are 100% free to use.
To install plug-ins on your blog, just go to Plugins > Add New in the WordPress dashboard, search the name of the plugin, click Install and then click Activate.
Congratulations, you just learned how to customize your blog and make design changes!
The next step is to learn how to write content for your blog.
Step 6: Start posting!
So far, you’ve established a domain name, chosen your blog hosting site, set up a blog theme, and you are ready to go. Your framework is complete.
Now all that’s left is to start posting!
Before you officially launch your blog, I recommend having at least 5 to 10 posts already published. This will give people more content to read and give you more posts to start sharing on social media.
Prepare and publish content on main pages
Depending on your individual needs you can decide what pages to publish. The following are the most common pages bloggers use:
- Homepage – This depends on what type of layout you choose. As I described above, when customizing your blog you can choose to display the homepage as a static page. In that case, you will have to prepare content for it.
- About us – The most traditional page on any blog is the “About us” page. This page tells new visitors what it is all about, who you are and why you run a blog about your niche topic.
- Contact – This page allows visitors to your blog to communicate with you. It can be a straightforward page with your email address plus your social network links, or you can use a simple contact form that visitors can use to communicate with you.
How to Make Money with a Travel Blog
Travel bloggers can make money in many different ways. Some of the most popular ways are:
- Affiliate marketing
- Display ads
- Freelance writing (You can join Fiverr)
- Sponsored content
- Press trips
- Selling your own products
How to Start a Travel Blog Recap
This guide showed you how to start a travel blog in five easy steps.
As a recap, here’s what you need to do:
- Choose a niche for your blog
- Choose a domain name
- Get web hosting ($2.95 a month from Bluehost plus a FREE domain name)
- Install a WordPress theme (BLOSSOM THEMES)
- Install WordPress plugins
Do you have any questions at all about how to start a travel blog?
Leave a comment below and I will be sure to answer!
